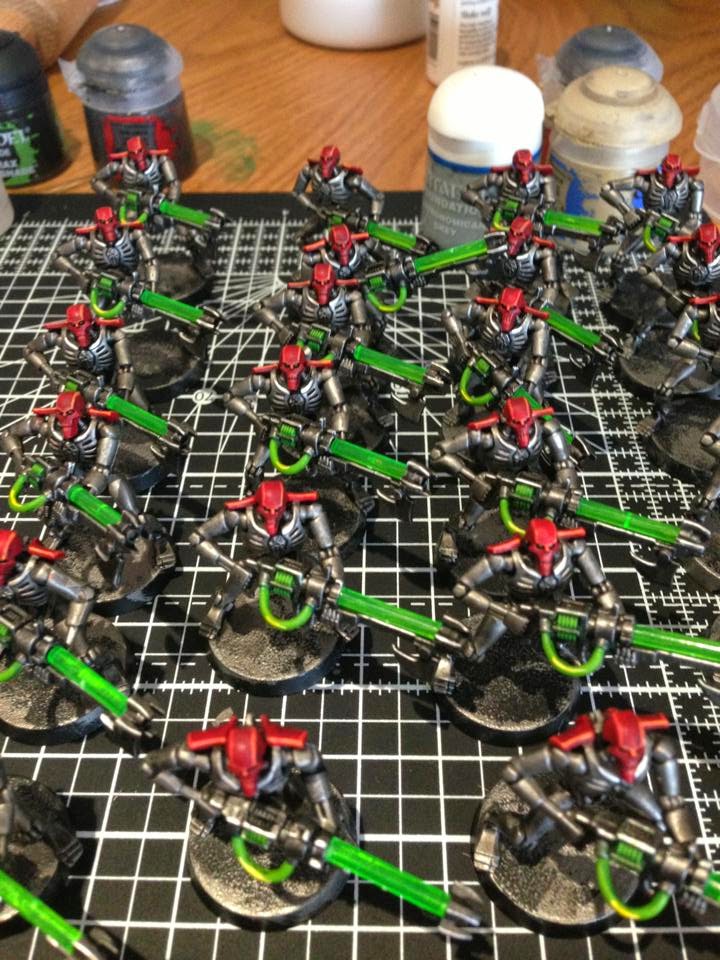
WELCOME FELLOW BOLT CATCHERS!


An Imperial Guard Warhammer 40,000 Blog, with the occasional deviation.

Now with added NECRON!!
WARNING! Slight Warzone: Resurrection, after taste.

Sunday, 11 May 2014

Si'Moog'Sit-Let Dynasty - Painting Guide!


A good friend and crazy Necron collector Paul Bullock recently posted on Facebook a series of steps detailing how someone could paint his Necron Dynasty colours: The dreaded Si'Moog'Sit-Let Dynasty.

With Apocalypse becoming more or less the norm, it seems to becoming a thing to copy someone else's colour scheme, at least being inspired by it.  Especially when you happen to play together.  Though Paul doesn't need much help, owning arguably the largest collection of Necrons in the world.


Warrior tutorial step 1
Spray them black, then with a large dry brush slap on claggy Leadbelcher. By claggy I mean a slightly wetter dry brush. They should then look like this. This is the first of 3 quick easy steps on the sliver parts before we add colour.


Warrior tutorial step 2
Drybrush the whole lot with Army Painter Plate Metal or GW Runefang. In pic 2 the warrior on the left has not yet been done. At this stage it's hard to discern but when the washes are added it makes all the difference


Warrior tutorial step 3
Paint the guns with a 50/50 mix of black and Ledbelcher. This makes all the difference.

On the left here is a finished warrior from my Dynasty so you can see what we are working towards.


Warrior tutorial step 4
Wash the whole mini with Army Painter Dark tone or Nuln Oil. Pic one shows the difference.


 The ones on the left here have been washed.


Warrior Tutorial step 5
Light drybrush just the edges with Army Painter Plate Metal or GW Runefang.


The Necrodermis is now complete and it's time for the colours


Warrior tutorial step 6
Pick out the power cells and the weapon cable in GW Moot Green


Warrior tutorial step 7
Edge highlight just the front facing upper edges of the weapons and the warriors collar bones. The green should now be dry enough for the next step.


Warrior tutorial step 8
Wash green parts with GW Biel Tan, then re-wash just the upper green section with reduced biel tan or thraka green. (Thicker so it resists gravity)


Warrior tutorial step 9
Using GW moot re paint the upper green surfaces in prep for a flick highlight and glaze


Warrior tutorial step 10
Add a white flick highlight to the cables then glaze all the green and white with GW lamenters yellow. This brings the weapons to life


Warrior tutorial step 11
Using thinned down colour paint the first layer on the shoulder blades using a basecoat brush


Warrior tutorial step 12
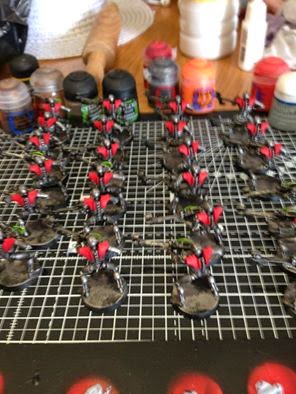
Well that took ages! But I have now applied 3 very thin coats of Mephiston red to all the shoulders..... Now for the heads!


Warrior tutorial step 13
Apply 2 thin coats to the face plates. The block colour is now done. Time to move onto the washes and edge highlights.



Warrior tutorial step 14
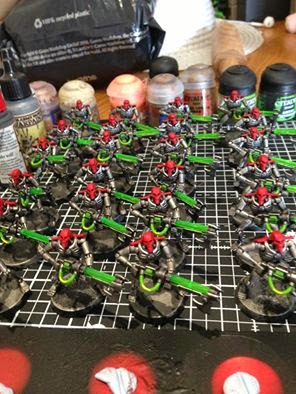
Add the green rods. It's important to do this now before we add the edge highlights. You don't want to be man handling the model to add the rods after the edge work.


Warrior tutorial step 15
Wash the colour in this case Mephiston red with Agrax Earthshade. If washed from the lower jaw upwards to the back of the head it brings all the facial features to life.


Warrior tutorial step 16, 
First edge highlight with wild rider red.


Warrior tutorial final step! 
Second edge highlight of fire dragon bright and paint in the eyes with moot green!


Warrior Phalanx 4 powered up and combat ready. 
Now I just need to base them.


Friday, 7 February 2014

Necrons Fin??


So next up was the Annihilation Barge.  Now these bastards you really cannot have to few of but my gods they are a bitch to assemble.  Note:  Keep the gun seperate until both parts are done!  DO NOT GLUE THEM TOGETHER UNTIL VARNISHED!


You can see the new one on the left here with my first A-Barge as comparison.  Noted I had not used the same prow end this time.  Aregh.  Going to have to buy a third no doubt to make the first the damn leader or something...


Focusing on the gun first, the AP Dark Tone paint really came into its own.  Sometimes it needs a little water to spread it out as it dries, but look at that definition!  I know most people paint the rails along the top and bottom of the weapon as energy, but I thought that would be too much shiny.  IMO and all that.


Starting to slowly build up the Skeleton Bone layers to match the first one.  It becomes an art form knowing where to layer it up and where to simply leave.  Nothing is perfect, but I like to think I am getting better after over 50 damn figures.  What do you think?


Finished!!! I chose to layer the red on the sides this time, to add some variety, but apart from that and the underslung Gaus Cannon, it is the in the same style ad the last.  Really happy with the change in red to Mephiston and the ink to AM's Dark Tone.


At this point in the evening I was getting rather tired and decided to forgo Necron selfies in favour of just getting it done.  Sincerest apologies.  However, on midnight, I finally finished the last remaining unpainted Necron model in my army (over 3000pts).  Anyone whose done this hobby will know, this is awesome.


Two Triarch Stalkers looking for trouble, or their contact lenses or something I don't know.


 Meanwhile, I played out of character and bought these off the internet...
But what could this mean??


Rick

Necrons - The Lych Guard have no spine!!

So.  As part of my innexoarable advance completing my assembled Necrons (Read: All of them), next up were the Elite Lych Guard.

Now this is going to be a short post, filled with lots of pics showing the painting process and the ahem, hiccup along the way.


As usual, I gave the guys a liberal spray of Army Painter Skeleton Bone, before drowing them in Agrax Brown ink (GW).  Then came the primary layers:  Mechanicus Grey on weapons and the heads, Mephiston Red on the spot colour sections and iconography.  Finally Some green colour I can't remember on the energy bits.  (So many new names and paints these days!)


First I focused on the shields completion.  I figured I would copy them from the one I painted for my Overlord (Count as Septipical Weave), so they would really knit together.  It also gave me a chance to remember how I layered on the final retouching layers of the Skeleton Bone paint.

Note I toyed with some Army Painter Dark Tone Ink this time, with mixed results.  It's more effective, but doesn't always go where you want it.   Tastes better though, so I was happy enough.


Boom!  Finished.  After the inks were dry and the retouching was done, the green was highlighted up and the metal and detail added.


Ahh, but wait!  Upon looking upon my completed work I noticed something amiss!  They were all missing something on their backs!  But what could it be??


ARGH!!!!!!!!!!!


So yeah, I had to paint the spines seperately before gluing them directly onto the figure and adding a final coat of Army Painter Clear Varnish.  (No Shine?).
I'm still having the issue of the grey scraping off easily.  I suspect its because of the over durability of the primary sitting underneath, or maybe its the varnish?  Two coats in future?

Anyway, at this point I have only the second Annihilation Barge and Triarch Stalker to finish, then everything I have that is Necrony is painted.  A milestone to be sure.

Thanks for reading,
Rick


Tuesday, 3 December 2013

Path to Apocolypse - More from the Front


Well after being distracted several times over the course of a week, my Just Paint It campaign finally restarted.  The next unit to be finished?  Another 5 Triarch Patriarchs.


That makes 10.  Dang I've forgotten the mixed joys of routine painting...  Taking a break until the christmas holiday as I have a whole week off planned to catch up painting the remainder of the Necrons I have already:
Annihilator Barge #2
Triarch Stalker #2
And something else ;)

Also on the way is a cheaper and nicer looking Necron Pylon alternative from Lasercutcard.  Being a fan of the Dawn of War series, the imposing megalith styled defences really call to me.

I need to get more normal warriors.  20 + 10 Immortals just doesnt cut it these days....

As an aside I recently enjoyed Fantasy Flights deceptive board game Battle Star Galactica.  I think I know who the Cylon was...


Thanks for stopping by!
PS: Check out my enemies!!
Rottimus
Terradax


Saturday, 23 November 2013

Just F*æ"ing Paint It!! A new quest.


So after finally finishing the Panther Ausf A for a friends birthday present I decided that I would never do comissions and that I needed to play dirty to catch up on my back log.

So, following a rule I have seen on the web "Just Paint It," I decided to lower my standards and go Soviet on my sorely neglected painting back log.  Basically I would be following these standards:
  1. Find the thing.
  2. Put the thing together.
  3. Paint the thing.
No consideration which lasts for longer than a minute would be allowed.  What colour works?  Whats in front of you?  No less than 2 tones.  No buying more until done.  The first up on the list?  These chaps (And chappete) Who for the better part of 6 months have been staring at me every time I have opened my gaming cupboard.  Pleading.  Begging.  Jerks.

So without further ado, and sadly no Wip Pics.  I present the celebrities of the Azin 3rd and last, my Imperial Guard army.


Choose your character!!!


Naval Officer Braggart and Astropath Xi'xu, discuss politics while the scribe skull records everything.

 Commisar's Lucious and Steinen practice execution shots against the latest offenders.


As you can see, each model had a simple palette selected, certain parts where marked out for colours (including a spot colour where appropriate).  Base coat, wash and any required highlighting (No more than two).  The bases were done the same as the rank and file.

As a note though, I'm becoming less and less satisfied with GW's Agrax Brown and Nuln Oil.  It seems as one Staffy put it "they are too good."  I need to find a sharper more aggressive ink to offset the soft staining affect these are putting out...  Any suggestions?


The last to be done was a reused Redemptionist Priest, (Better Red than dead!) and a beautiful fig I got off the internet a long time ago.  Thinking Inquisitor with Hell Rifle?  Very detailed though.  


Old school GW circa the 90's, Necromunda era.  Not too much in the detail department.  Sadly the Anti Shine varnish from Army Painter seems to be getting old, some speckle as an after affect?


Fell foul of "Eye Syndrome."  The figure was so nicely sculpted I just had to give this one some more love. While this went against the rules above, I figured I know the boss and could bride him with some whisky.  (Edit:  It worked!).


After nailing these very unique character models I had planned on moving onto some Spartan Games, Firestorm Armada stuff for a change.  However a recently planned Apocolypse game in January has changed things.  I will be using Necrons.

Let the path to Apocalypse begin!!

GERMAN STEEEEL!


So taking a break to do something new.  After playing Company of Heroes with a good friend of mine, FOR OVER A YEAR, you get to know them well. My my buddy loves Panthers. 

No, not the furry sleek black animal that won't be with us for much longer, the tank!

So, for his birthday I drunkenly promise to build him one for his room.  Now he isn't long into the hobby himself, and quite frankly I haven't got much experience going to town on a single scale model kit.  (There are several differences between scale model building and wargame model building, let me tell you!).

Grabbing a Dragon Panther Ausf A kit on discount from Wonderland Models, I got a damn good deal from those nice Scottish Gentlemen, whose customer service and care is legendary.  I love those guys.  Now I have two reasons to visit Scotland!!

Now the kit is intimidating.  Unlike the usual built for ease kits that GW make, I'd forgotten how damn fiddly and infuriating scale kits can be.  Namely, the instructions were translated horrifically from Japanese and the pics didn't often match the actual product.  This was were my experience making gaming models came in.  I... improvised.

The hardest part as usual with Tank or tracked AFV's was of course the bloody tracks.  These sections took me the longest and I'd be lying if I said the longest part of that was spent actually assembling it.  No, no, most of it was looking back and forth between the instruction manual, to the sprue, to the PC screen where I'd looked up reference pics of actual Panthers in the field. (Incidentally, its a really good idea, but be prepared for lots of blown up German tank pics...)

Now my friend did finally give me a preference on colour.
"Dirty grey".

Right.  I can do that.  It's one of my skills!  But this time I would experiment.  First though, enough text!  First pic.


After assembly, I primed with Army Builder Black.  Simple enough.  Though was the elastic track sections and the sprue in WARM (READ NOT BOILING) water to prep them for the spray.  Otherwise you'll get awful side affects.

For a first coat I used GW's Mechanicum Grey for a good medium tone to work from.  Next I used GW's Nuln Oil wash to pick out the shading.  My intent was to bring out the wear and tear on the tank as I went. 

I then went back over in the MG colour, flattening certain areas but leaving crevasses, drip points and generally leaving the parts of the tank most likely to discolour or suffer paint deterioration first.  Time and time again I see massive differences between highlighting edges and low lighting them with such wear and tear.  I used to be a strong fan of the former, but after this figure... I think I like my tanks dirty. :D


Forgive the pics, sadly I changed camera during this process so all I have is that first one and these of the finished product.  :'(  Still.

Next up was a healthy smatering of Agrax brown in the cracks, more Nuln Oil on the edges before diving into the more pastel colours.  First up was Abaddon Black  on the edges before edging it with the odd faint touch of Skull white to simulate the Tanks primer coat wearing out. 


 Next was the experimental bit and it took no small part of research on youtube etc.  It really displayed that a scary amount of skill is out there.  Pigments.  The thing wargamers whisper about in the same sentence as the meaning of life.  Using Vallejo's rust pack I went a bit nuts, lacing many obvious places where rust would build up and then some.  At one point I had to use the Pigments useful quality of reduction after I had finished as I'd used far too much!

Lesson?  Less is more but you can take it off!  Also, Pigments don't always dry the same colour as they look.  What I thought would be brown turned out to be more rust!!


For the tracks I smothered them in GW's Stirland mud (There must be a better way!!!) and built up the muddy brown to a lighter dry dirt colour using P3 Gun Corps and then dry brushing with Bleached Bone.
I then followed up the same procedure on the hull itself, following the natural destination of all mud thrown up by this beast. 


For the base I simply grabbed a cheap frame from work (Thanks Marius!).  Taking out the glass I sealed the back on and removed the fittings.  I then filled the inside with poly filler (Sparkle på norsk), using tape to mask the edges.  Sadly despite my best efforts, the super glue I used marred the gloss finish of the frame.  Not a huge mistake but, lessons learned.  
The sloshed up "mud" was then sealed with watered down PVA glue, as Poly filler is notoriously thirsty.  Leaving the "tread marks" I used thick PVA this time.  I heaped on two layers of sand, bashed off the loose bits and let it set for an hour before smothering it with a watered down layer.  One more for luck before I finally left it to dry over night.
Painting was simple enough.  Black spray followed by the same paint and drybrush procedure I had used on the tracks.  However, later I would need to use more poly filler and paint to set the Tank into the dirt, so it didn't simply sit on top.


 The dude on top was treated to my ahem, best gamer painting techniques, the face came out better than I hoped.  The detail on the man wasn't the best, but luckily something I'm used to (Have you seen Games Workshop circa 1997??).  Remembering that nothing is ever truly black, the subtle grey highlights on the leather were inspired by recoloured pics of panzer crews. 
And yes, he had to be blonde. -_-
Most of the detail work was simply "simulating" the affect of detail.  Putting on thin lines of rank etc where the figure itself had none.

On a last note, the transfers on this were as usual, an absolute bastard.  S'cuse the French.  Youtube offers a wide variety of helpful tips, but I think I will be getting a transfer setting kit.  It makes this all the easier.  Hell, we didn't have fixing agents etc back in the 90's!

Lots of lessons learned in what turned out to be a fantastic project.
I've got around 20 Imperial Guard tanks waiting similar treatment next year.

Be warned ;)

Thanks for reading,
R

PS:  Any rumours that I destroyed the original tank treads by treating them to a wash of boiling water which shrunk them and I had to beg for replacements, is a filthy lie.  I didn't beg.  I asked nicely. :)


Friday, 23 August 2013

Stripping paint and gaming on a budget.


So. Saving up for a wedding.  Add in a suprise dental bill, student debts a credit card bill etc etc... And suddenly I have joined thousands of broke gamers out there.  No deterred, I decided to focus on doing what I could which didn't cost anything.

Firstly!  Having suffered for too long with a piss poor carry solution (Namely a shoebox filled with sponge) I decided to do two things:

 Firstly I removed my oldest Imperial Guard army from its old double case.  A Christmas present from GW in my days on the line.  It's basically an old mech based snow themed force, bad paint job.  Time to retire it for recycling.  Big bonus is a nice big case which can hold more than I have now.  Also, I managed to order a tray for that bloody Monolith, which pockets for two Crypt barges or Doomsday Weapons should I feel adventurous.


 But the old army had a total of 10 chimera, 2 Chimadon (wiki it!), a Hellhound and more besides.  Horrible paint job.  That would need to go. 

So after consulting my gaming colleagues, I learned not 1 but 2 methods!

Firstly, using washing up detergent, one method is to continually saturate the figures in a bucket of warm soapy water, continually replacing the cold water with more warm and more soap.  The process isn't dangerous but takes time.  Something I sadly don't have.  Usual time required 4/5 hours.


 That wasn't going to work with my schedule!  However another slightly more dangerous method involving a local specialty called Blå Spirit (Blue Spirits or Blue Isopropylene (sic) ).  Soak the figures in a bucket for 15 or so minutes and bring out for a scrubbing.  Be warned though!  It effectively reduces the paint into a liquid state for scrubbing and washing off but it will spray around and it will dry off again effectively "moving" the paint.  So.  Do it outside, with gloves and dirty clothing.  The good news is, its bloody effective.

Sadly its also expensive at 6 GBP a bottle.


 Meanwhile, I discovered some more odds and sods that were ready for priming and painting.  This line up of characters are next on my list.
 

 And so are these guys!  I might have mentioned them before, but not too long ago I acquired some Desert War 8th Army guys made for WW2 Games, in this case Bolt Action, though Battlegroup by Warrick Kinrade looks interesting.  A whole platoon for around 15 potatoes from Warlord miniatures.  Not bad.
 

Speaking of Warlord Miniatures and Bolt Action.  A preview of the upcoming Armies of France and her allies has appeared on the internet.  Most importantly (well to me living in Norway) is this pic of the Norwegian Defence Forces.  My dream of reenacting the short but not unheroic war in Norway is coming closer!


Thats all for now, but rumours of my demise are largely inflated...

R